在我们的日常科研生活中,一般都是在本地上安装好TeX Live进行LaTeX的编写,或者在线使用Overleaf进行编辑。最近Github支持个人项目的Codespaces功能,可以在浏览器上直接使用VS Code进行代码编辑,而且支持一定的免费时长(免费个人用户支持15G的存储空间+120的核心小时数;Pro用户支持20GB的存储空间+180的核心小时数,详见Github文档,当然学生可以免费白嫖Pro用户啦~)。这里我们就来尝试一下使用Codespaces作为在线LaTeX编辑器。
初始化Github Codespaces环境
首先我们需要在Github上创建一个新的仓库,将自己的LaTeX项目Push上去(如果已在Github上,忽略)。然后进入项目主页,在“Code”绿色按钮上打开“Codespaces”选项卡,点击“Create codespace on Simplified”按钮,即可创建Codespaces环境。

在项目上创建Codespace环境
进入到网页版VS Code后,打开终端,输入以下命令安装LaTeX环境:
sudo apt update
sudo apt install texlive-full
打开侧边扩展,安装LaTeX Workshop插件。

安装LaTex Workshop扩展
调整LaTeX Workshop配置
一般来说,我们使用XeLaTex进行LaTeX项目的编译。所以需要对LaTeX Workshop进行一些配置。
在VS Code网页中按F1,输入preferences user json,进入到用户设置的JSON文件中,将以下内容添加到文件中:
{
     //------------------------------LaTeX 配置----------------------------------
    // 设置是否自动编译
    "latex-workshop.latex.autoBuild.run":"onSave",
    //右键菜单
    "latex-workshop.showContextMenu":true,
    //从使用的包中自动补全命令和环境
    "latex-workshop.intellisense.package.enabled": true,
    //编译出错时设置是否弹出气泡设置
    "latex-workshop.message.error.show": true,
    "latex-workshop.message.warning.show": false,
    // 编译工具和命令
    "latex-workshop.latex.tools": [
        {
            "name": "xelatex",
            "command": "xelatex",
            "args": [
                "-synctex=1",
                "-interaction=nonstopmode",
                "-file-line-error",
                "%DOCFILE%"
            ]
        },
        {
            "name": "pdflatex",
            "command": "pdflatex",
            "args": [
                "-synctex=1",
                "-interaction=nonstopmode",
                "-file-line-error",
                "%DOCFILE%"
            ]
        },
        {
            "name": "latexmk",
            "command": "latexmk",
            "args": [
                "-synctex=1",
                "-interaction=nonstopmode",
                "-file-line-error",
                "-pdf",
                "-outdir=%OUTDIR%",
                "%DOCFILE%"
            ]
        },
        {
            "name": "bibtex",
            "command": "bibtex",
            "args": [
                "%DOCFILE%"
            ]
        }
    ],
    // 用于配置编译链
    "latex-workshop.latex.recipes": [
        {
            "name": "XeLaTeX",
            "tools": [
                "xelatex"
            ]
        },
        {
            "name": "PDFLaTeX",
            "tools": [
                "pdflatex"
            ]
        },
        {
            "name": "BibTeX",
            "tools": [
                "bibtex"
            ]
        },
        {
            "name": "LaTeXmk",
            "tools": [
                "latexmk"
            ]
        },
        {
            "name": "xelatex -> bibtex -> xelatex*2",
            "tools": [
                "xelatex",
                "bibtex",
                "xelatex",
                "xelatex"
            ]
        },
        {
            "name": "pdflatex -> bibtex -> pdflatex*2",
            "tools": [
                "pdflatex",
                "bibtex",
                "pdflatex",
                "pdflatex"
            ]
        }
    ],
    //文件清理。此属性必须是字符串数组
    "latex-workshop.latex.clean.fileTypes": [
        "*.aux",
        "*.bbl",
        "*.blg",
        "*.idx",
        "*.ind",
        "*.lof",
        "*.lot",
        "*.out",
        "*.toc",
        "*.acn",
        "*.acr",
        "*.alg",
        "*.glg",
        "*.glo",
        "*.gls",
        "*.ist",
        "*.fls",
        "*.log",
        "*.fdb_latexmk"
    ],
    //设置为onFaild 在构建失败后清除辅助文件
    "latex-workshop.latex.autoClean.run": "onFailed",
    // 使用上次的recipe编译组合
    "latex-workshop.latex.recipe.default": "lastUsed",
    // 用于反向同步的内部查看器的键绑定。ctrl/cmd +点击(默认)或双击
    "latex-workshop.view.pdf.internal.synctex.keybinding": "double-click",
    "latex-workshop.view.pdf.viewer": "tab",
    "editor.inlineSuggest.enabled": true,
    "vscode-office.openOutline": true,
    "github.copilot.enable": {
        "*": true,
        "yaml": false,
        "plaintext": false,
        "markdown": true,
        "latex": true,
        "bibtex": false
    },
    "http.proxyStrictSSL": false,
    "editor.unicodeHighlight.allowedLocales": {
        "zh-hans": true,
        "zh-hant": true
    },
    "git.confirmSync": false,
    "window.zoomLevel": -1,
}按Ctrl + S保存后,在侧边栏打开LaTex Workshop控件,观察Build LaTex project子命令中是否出现了Receipt: xelatex -> bibtex -> xelatex * 2。
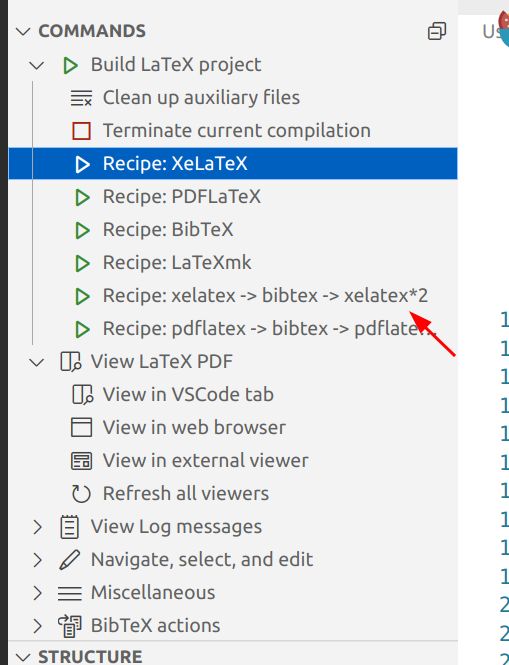
观察LaTeX Workshop控件
开始编辑
此时可以直接编辑LaTex论文了!编辑后按Ctrl + S保存即可实现自动编译。
要打开侧边PDF预览,可以按Ctrl + Alt + V,或者在LaTeX Workshop控件中点击View LaTeX PDF,或者也可以在上方工具栏点击下图箭头所示的按钮。注意,第一次打开预览窗口时,可能会在浏览器新建一个标签页,这时需要手动关闭,并花一点时间等待加载。如果加载不成功,关掉预览窗口并重新打开看看。

打开侧边PDF预览
如果需要由编辑器定位到PDF中的对应位置,可以按Ctrl + Alt + J;
如果是由PDF定位到编辑器中的对应位置,双击PDF文档相应位置即可。
编译时间也是十分理想的!对于短篇英文论文来说,编译时间大概在4-5秒左右,对于长篇的中文论文来说,编译时间大概在20秒左右。总结起来,使用LaTeX Workshop插件编写LaTeX论文有以下优势和劣势:
优势:
-
媲美本地的LaTeX + VSCode编写环境,90%操作还原度;
-
与Github无缝集成,可以直接在VSCode中进行版本控制;
-
理想的编译速度;
劣势:
-
免费时长有限,不适合长时间使用;
-
PDF预览相比本地还是有点卡的,而且第一次打开特卡!并且有可能加载失败,这个bug需要排查一下看看怎么解决。
总的来说,使用VSCode + LaTeX Workshop插件编写LaTeX论文还是十分方便的,而且编译速度也是非常理想的。如果你的论文不是很长,或者在外地出差时需要在没有安装LaTeX的电脑上紧急修改论文,那么这个方法还是十分推荐的!!!
ENJOY YOURSELF!
附录:一些问题的解决
字体相关
由于学位论文的LaTeX模板可能会涉及一些Windows字体而导致XeLaTeX编译失败,需要根据编译报错信息安装相应的字体。可以在Google搜索“字体名称 + Github”,下载后安装即可。
常用的字体网址:
- 仿宋(FangSong): https://github.com/dolbydu/font/raw/master/unicode/FangSong.ttf
- 宋体(SimSun):https://github.com/dolbydu/font/raw/master/unicode/SimSun.ttc
- 黑体(SimHei):https://github.com/dolbydu/font/raw/master/unicode/SimHei.ttf
- 楷体(KaiTi):https://github.com/dolbydu/font/raw/master/unicode/Kaiti.ttf
- Times New Roman:https://www.freebestfonts.com/yone//down/times.ttf
- Arial:https://raw.githubusercontent.com/matomo-org/travis-scripts/master/fonts/Arial.ttf
- Courier New:https://raw.githubusercontent.com/AlexandrovLab/SigProfilerPlotting/master/fonts/Courier%20New.ttf
使用wget将字体安装到/usr/share/fonts目录下,如下载仿宋字体:
sudo wget -P /usr/share/fonts/ https://github.com/dolbydu/font/raw/master/unicode/FangSong.ttf使用fc-cache命令更新字体缓存:
sudo fc-cache -fvcryptocode库相关
密码学的同学可能会用到cryptocode库,但是如果需要引入该库时使用oracles选项,编译时可能会报错:”Package crypto code: Unknown option ‘oracles’.”。如下图所示。

cryptocode库报错
此时需要下载最新的cryptocode版本重新编译即可。使用以下命令:
cd
wget https://mirrors.ctan.org/macros/latex/contrib/cryptocode.zip
unzip cryptocode.zip && cd cryptocode
pdflatex cryptocode.ins
sudo cp cryptocode.sty /usr/share/texlive/texmf-dist/tex/latex/cryptocode/
此时重新编译就可以通过啦~